Cleaning with vinegar

I have seen post after post about cleaning with vinegar. To be honest, the smell is awful to me so I have never tried it. That is until this week. We just moved into a new house and the faucets could use some cleaning. I decided to give vinegar a try….and I was not disappointed. In fact vinegar is my new best friend:) Here are some before and after photos (these are unedited photos, only added text).

For faucets with mineral build up, all you need to do is put vinegar into a bag, secure the bag onto the faucet, and let it soak for 30mintues-1 hour or longer if you need to do other stuff. No scrubbing, nada….take the bag off and be amazed!

Next my sweet kids have a tendency to be hard on my kitchen table…by that I mean they scratch it with utensils (accidentally of course).  So I read that you can mix 1 part olive oil with 1 part vinegar. Scrub the scratches with the mixture and see what happens….here is my proof (and again no editing done here)!

Not bad for results, right?!

Two minute microwave fudge


Fudge is definitely one of my favorite special treats….the kind you only get on vacations or for special events.  Yesterday, for some reason I was really craving some. I logged onto Pinterest to see what I could find. Quick, easy, and with ingredients I already had were my search requirements. Most fudge recipes have sweetened condensed milk which is not something I have on hand because I don’t like the flavor! Other recipes called for marshmallow creme and again I don’t have that. Finally came across a picture of a recipe (no link to a website or author) for this fudge with ingredients I already had and thought I would give it a go! It turned out SO good…set up perfectly too!  I haven’t taken pictures of the pieces of fudge, because you see I have been too busy eating them;)

Here’s how you can make some delicious fudge in under 5 minutes:

  • In a large microwave safe bowl, sift together 4 cups powdered sugar (1lb, which is one box), 2/3 c cocoa powder, and 1/4 teaspoon of salt.
  • Mix in 1/4 cup of milk and two teaspoons of vanilla. Mix until it’s hard to mix any more. This takes a minute but it will eventually come together.
  • Cut one stick of butter (1/2 cup) into pieces and place on top of the mixture.
  • Microwave on high for two minutes.
  • Use wooden spoon and beat until smooth.
  • Pour into greased pan (recommended size is 8 x 8 x 2). I used nonstick foil in my pan. Put in fridge for an hour until set.

Hope you enjoy!

Mint Buttercream Icing

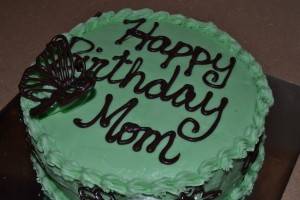
My mom and dad came to visit a couple weeks ago and since it was close to her birthday I got to make her a cake. She loves chocolate and peppermint flavors. Who doesn’t though?! I found a recipe to make mint flavored buttercream, and it was too good not to share!

 DSC_0053


Ingredients:

  • 2 sticks of butter, softened
  • 6-8 cups powdered sugar
  • 1/4 cup or so of milk
  • 1/2 tsp of peppermint extract
  • a few drops of green food coloring (optional)

Directions:

  • Using an electric mixer on medium-high speed, beat the butter until smooth and fluffy.
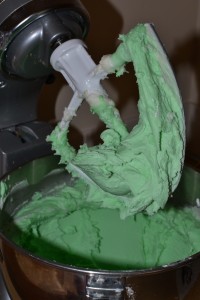
  • Add the powdered sugar, a cup at a time, until mixture is dry and and almost crumbly.
  • Add the extract, food coloring, and then milk- a little at a time until frosting is smooth, creamy and spreadable.

*Original recipe from The Baker Chick can be found here.

*I made my favorite chocolate cake recipe which can be found here. It matched perfectly with this icing!

DSC_0056

For the chocolate decorations, I will be adding a how to post soon!


Easter Craft Ideas

Just a few fun crafts for Easter…

To make the bunny, use paper plates for the head and body. Make 2 sets of footprints on card stock paper. Cut out the prints and glue onto the body. Decorate and paint as desired!

We made our own Easter cards to send. Paint the child’s palm, index finger, and pinky finger. Make prints into bunnies!

Paint printed Easter eggs with a fun paint…mix koolaid powder and corn syrup.  Dries shiny and a bit raised. Warning: this is messy and takes a long time to dry. Will also drip when hung up, so make sure the floor beneath can be cleaned easily.

Make stained glass eggs or crosses with contact paper, tissue paper, and construction paper. Cut your shape out of construction paper. Place onto a sheet of clear contact paper. Stick little pieces of tissue paper onto the shape. Use another sheet of contact paper on top to seal it. Trim around the shape and hang.

Hope you and your little ones will make some fun Easter crafts soon!