End of year teacher gifts

IMG_1949[1]   Looking for a way to say thank you to your kids’ favorite teachers? My daughter has loved her first year of school and many thanks goes out to her amazing teachers who have made each day fun and exciting!  I love Bath & Body Works soaps, so I thought I would send each teacher  a bottle of hand soap with the message:

IMG_1951[1]

I also LOVE this book: “Mrs. Spitzer’s Garden“!

IMG_1952[1]

Here’s the book description from Amazon:

“Mrs. Spitzer is a wise teacher who knows many things. She knows about gardens. She knows about children. She knows how similar they are. And how they will flourish if tended lovingly.”

Click on the title of the book to order it directly from Amazon and send it to your favorite teacher too!

*Please know I am not endorsed by Amazon or this book…I just love this book and thought I would share! All opinions are completely my own!

Banana Bread Donuts with Browned Butter Glaze

Let’s just start by saying that you should only make this recipe if you plan to let yourself eat every last do-nut I love banana bread and this just takes it to another level. Imagine a slice of banana bread in the shape of a do-nut…only wait….cover it in an amazing glaze! It was hard not to eat the glaze directly from the bowl by the spoonful. Enough talking, let’s get to baking!

IMG_1891[1]

Ingredients
         Do-Nuts (makes 2-3 dozen depending on thickness and size)
  • ½ C butter
  • ½ C vegetable oil (applesauce can be substituted)
  • 
3/4 C sugar
  • 
2 whole eggs and 4 egg whites
  • 2⅔ C flour
  • 
2 tsp baking soda
  • 4 overripe bananas- add one at a time

Browned Butter Glaze:

  • ¼ C butter, browned on stove
  • 2 C powdered sugar
  • 1 tsp vanilla
  • 2-3 Tbsp lowfat milk

Directions:

  1. Beat butter, oil, and sugar in your mixer.
  2. Add in the eggs and egg whites and mix.
  3. Mix the flour and baking soda together in a separate bowl and then add it slowly into the egg mixture.
  4. Mix in the bananas one at a time until well blended.
  5. Pour into a well greased do-nut pan. Fill do-nut well about 2/3 full.
  6. Bake at 350 for 7-9 minutes.
  7. Transfer to a cooling rack to cool.

*Once you have baked all of the do-nuts, you can make the glaze. The glaze sets so quickly that you can’t make it until you are completely ready to use it.

  1. Brown the butter in a small saucepan over medium-high heat stirring constantly. When the butter turns brown in color and smells oh so good, remove it from the heat.
  2. Add in the powdered sugar and milk and whisk until smooth.
  3. Stir in the vanilla.
  4. Pour over donuts. I tried dipping some but the icing is so hot that it is difficult.
  5. I found that this amount of icing covered half of the don-nuts and would probably double the amounts next time. However, I love icing and always want more!

*I found this recipe here and only changed a couple of things!

Frozen Buttercream Transfer

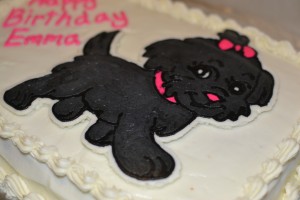
DSC_0085

I wanted to try making a frozen buttercream transfer so my daughter’s birthday was the perfect opportunity to try it out. I watched this video to learn how.  Here are a few pics and things I learned along the way!

  • First you will need an image you want to use. I printed a coloring page of a puppy.
  • Turn the coloring page over and use a black marker to trace a reverse image of the design. I just drew it right on the back!
  • Grab a sheet of parchment paper and tape it to your design image. You will need to put the image onto something moveable that will fit in your freezer….like a cookie sheet. I don’t have a cookie sheet that will fit so I used a thick piece of cardboard….a cake board to be exact!
  • You need a dark buttercream to create the outline (draw on the reverse side). I used black buttercream. Use a small piping tip and outline the complete image.
  • Next fill in the spaces with your colored buttercream using a small tip like a wilton #5. I used a dark gray and pink butterce.  You will want the consistency of your buttercream to be pretty soft so you get  a nice smooth transfer. Mine was a little too thick and wasn’t as smooth as I thought it would be. Lesson learned;)
  • Next outline the entire image in the color of your cake icing…mine was white so I outlined in white. Cover the entire back of the image in white buttercream.
  • Place in the freezer for at least 90 minutes or overnight.
  • When you are ready, take the transfer out of the freezer and carefully flip it over. It will slide right off the parchment paper and you can place it on your cake!

*This is a fun way to make your cake look fancy and it’s super easy. Try it and be sure to let me know how it goes!  IMG_1837[1]

This is the reverse image completely decorated and outlined in white.

IMG_1838[1]

Here is the transfer covered in the white buttercream and ready to be frozen.

IMG_1839[1]

This image is just to show how thick the transfer is!

IMG_1837[1] DSC_0085

See the reverse image on left and the real deal on the right?  Just thought it was fun to see it side by side!

Puppy theme birthday party ideas

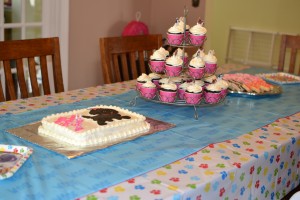
For my daughter’s second birthday, we did a puppy themed party. Here are a few things I made for the party! Enjoy!

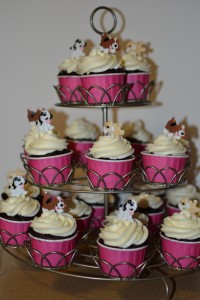
DSC_0093

DSC_0074

For the puppy cupcakes, I used a buttercream recipe from Sweetopia and my chocolate cake recipe can be found here.  I used a large decorating tip to pipe a swirl on top of the cupcakes and added a cute puppy toothpick I found on amazon.

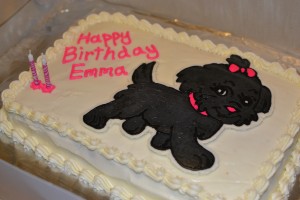
DSC_0081

For the cake I made a basic white cake and used buttercream to decorate it. For this cake I used the basic buttercream recipe from Wilton. I iced the cake and piped a shell border on the edges with plain white buttercream.  I made a buttercream transfer of a puppy to finish it off.  I will do a separate post to explain that one!

DSC_0100

And of course I wanted puppy themed cookies. For the recipe and directions on the cookies, click here.

To finish it off, I made a puppy pinata to match!