Pumpkin and Banana dog treats
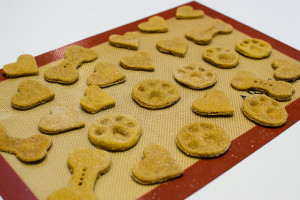
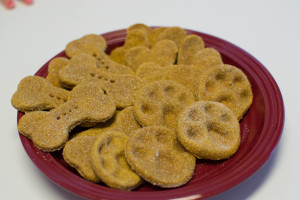
We enjoy making our Golden Retriever dog treats! We tried a new recipe today that was super easy, and Layla approved!
Homemade Banana & Pumpkin Dog Treats
Ingredients: (Makes about 3 dozen)
- 1 very ripe banana
- ½ can pumpkin purée
- 1 tablespoon honey
- 2 cups whole wheat flour
- ½ teaspoon baking powder
Directions:
- Preheat the oven to 350°F.
- Mix banana, pumpkin, and honey in your mixing bowl.
- Add flour and baking powder and beat into the mixture.
- Roll it out on a floured cutting board and cut out shapes with a cookie cutter.
- Place on a baking tray covered with parchment paper or a silpat mat and bake for 10–12 minutes. They should be lightly golden.
- Cool on a wire rack.
- Store in a jar with a closed lid.
Recipe adapted from: Sweet Paul
- To make the circles have paw prints on them here’s what I did. After you cut the circles out, bake for 2 minutes. Pull the tray out of the oven. Use thumb to make an imprint and the pinkie finger to make the little toes. The imprint is easy to make if the dough is slightly warm rather than making it before you cook it.
4 Layer Chocolate Cake with Mint Flavor Icing
I saw a cake like this on my Facebook feed and decided to recreate it. I loved the original recipe but wanted to try my own recipes to make it this time. I made too much chocolate ganache as it overtook this cake, so next time I will only use half of the ganache. But let me tell you this cake was DELICIOUS! Would be a great cake to make and take anywhere! We loved it!
Cake Ingredients:
- 1 box of Devil’s Food Cake Mix
- 1 small box of instant chocolate pudding
- 3/4 c vegetable oil
- 3/4 c sour cream
- 1/2 cup hot water
- 3 eggs
- 2 t vanilla extract
Cake Directions:
- Preheat the oven to 350.
- Throw all of the ingredients into your mixing bowl and mix on medium for 2 minutes.
- Pour into greased cake pans. ( I used two 9 inch pans and lined them with foil for easy removal. I sprayed the foil lightly with cooking spray oil.)
- Bake the cakes for 22-25 minutes.
- Let cool completely.
- I used a cake leveler to cut each 9inch round into two pieces. This is optional but will give you four thin layers as opposed to two layers.
While the cake bakes and cools, go ahead and make the icing.
Icing Ingredients and Directions:
Mint buttercream icing (goes between the layers)
- 2 sticks salted butter
- 1 t vanilla extract
- 1 t peppermint extract
- 4-5 cups of powdered sugar (about half of a two pound bag)
- 4 T heavy whipping cream
- Place the butter (softened to room temp) in your mixing bowl and beat for 5-6 minutes until it is light, fluffy, and almost pale in color.
- Mix in the vanilla and peppermint extracts.
- Slowly mix in the powdered sugar. It will look a little dry but that’s ok.
- Now mix in the heavy whipping cream and mix for a couple of minutes.
- Optional step: add a drop or two of green food coloring for a fun “mint” look.
- Spread the mint icing between the chocolate cake layers.
Chocolate Mint Buttercream Icing (covers the entire cake)
- 2 sticks salted butter
- 2 t vanilla extract
- 2 t peppermint extract
- 4-5 cups of powdered sugar (half of a two pound bag)
- 1/4 cup cocoa powder
- 4 T heavy whipping cream
- Place the butter (softened to room temp) in your mixing bowl and beat for 5-6 minutes until it is light, fluffy, and almost pale in color.
- Mix in the vanilla and peppermint extracts.
- Slowly mix in the powdered sugar and the cocoa powder. It will look a little dry but that’s ok.
- Now mix in the heavy whipping cream and mix for a couple of minutes.
- Spread the chocolate mint icing all around the sides and the top of the cake.
To decorate:
- You will need two small boxes of Andes mints.
- I made a border of the bottom of the cake with the mints and chopped some to put on the top as well.
- To make the chocolate ganache: melt 1/2 cup of chocolate chips (I used semi-sweet.) and 1/4 cup of heavy whipping cream together in a microwave safe bowl for 30 second intervals until melted. Only took a minute total for mine and it looked funny until I really mixed it well. Then poor that ganache over the top of the cake and let it drip down the sides. I used double that amount and it was too much!
- Throw the chopped Andes mints on top for a final decoration.
Hope you enjoy my version of this cake!

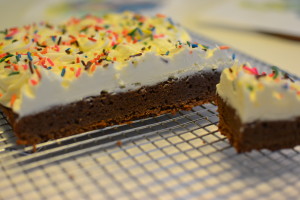
Birthday Brownies
My daughter recently had a birthday and wanted brownies on her birthday. So I searched and found a recipe that looked good. I am happy to say it was! And it makes a small batch of brownies instead of a huge pan!
Brownie Ingredients:
- 1/2 cup unsweetened cocoa powder
- 1 cup all purpose flour
- 1/2 teaspoon baking powder
- 1/4 teaspoon salt
- 1 cup sugar
- 1/2 cup butter (melted)
- 1 teaspoon vanilla extract
- 2 large eggs
Brownie Directions:
- Melt the butter in a microwave safe dish and set aside.
- Mix dry ingredients together in a bowl: cocoa, flour, baking powder, and salt.
- In your mixing bowl, beat the melted butter and sugar together. Add vanilla and eggs.
- Slowly add in the flour mixture and mix until combined. Batter will be thick.
- Line an 8 by 8 pan (or similar) with foil. Spray foil with nonstick spray and pour batter into the pan.
- Bake at 350 for 30-35 minutes.
- Cool brownies completely and then make buttercream frosting if desired!
Buttercream Frosting Ingredients:
- 1/2 cup butter, room temp
- 1/4 Crisco (vegetable shortening)
- 2 and 1/2 cups powdered sugar
- 1-2 Tablespoons heavy whipping cream
- 1 Tablespoon vanilla extract
- sprinkles (optional)
Buttercream Frosting Directions:
- Beat the butter in your mixing bowl with the Crisco for about ten minutes. The color will lighten so watch for that and it’s ready. Be patient with this one as this step helps with the buttercream texture tremendously.
- Add in the powdered sugar, vanilla, and heavy cream and mix well.
- Adding more cream will make the icing smoother and easier to spread. If you plan to use the icing to decorate you will want to keep the icing a bit stiffer so it holds shape.
- If you want to avoid the crisco, that works too. Just substitute real butter in its place! Crisco is really just used to help the icing hold shape but not needed!
- Spread or pipe the icing onto the brownies and use sprinkles if you like!


