Pizza Night

One of my favorite meals to make is homemade pizzas. Want to know why?

1.  It gives me an excuse to make dessert pizza!

2.  My kids will actually eat it!

AND

3.  My kids love to help roll out the dough and put the pizzas together.

SO today I had the privilege to make dinner for a friend and her family.  I made four batches of pizza dough which made 8 medium size pizzas!  I thought I would share my favorite recipes for pizza dough and a few tips I’ve learned along the way!

Let’s start with the pizza dough. I have a favorite recipe to use for regular pizzas and a different recipe to use when making cheese sticks.

For the pizzas, I use a recipe from Lauren’s Latest.  It is super easy and quite delicious. It uses water, yeast, honey, salt, olive oil, and bread flour.  Lauren does such a good job explaining the process, so I will just give you the link.  Click here!

*One note on the pizza dough, I make it in the morning and let it rise until doubled in size. I then put the dough into the refrigerator until I am ready to use it. With four batches of dough today, I had a fridge full!  About an hour before I planned to put the pizzas together, I took the dough out and rolled it into the tins pans I had purchased.

*I would recommend prebaking the dough before you add the toppings.  Bake about 8 minutes until the dough starts to turn light brown.  Then comes the fun….top the pizzas as you desire.

*I would also challenge you to buy a block or two of Parmesan cheese and grate it yourself. It is so much better than the stuff you buy in a bag. Try it…you won’t be disappointed!

For the cheese sticks, I use a little different recipe. It is much thicker and a little sweet…supposed to be like Pizza Hut dough. It uses water, yeast, sugar, salt, flour, and non-fat dry milk. Click here for the recipe!

*I top my cheese stick dough with fresh Parmesan and mozzarella cheese and then bake.

*After baking I like to add a little seasoning. Mix 2 Tablespoons of grated Parmesan(the stuff in a container that you buy), 1 teaspoon garlic powder, and 1 teaspoon Italian seasoning. Sprinkle on hot cheese sticks.

And now for a few pictures….

DSC_0040 DSC_0042 DSC_0043 DSC_0044 DSC_0045

Cinnamon Streusel Pizza recipe found here! It is one of my favorite dessert pizzas!

Chocolate Cupcakes with Peanut Butter Icing

Looking for a light, fluffy, and moist chocolate cake recipe? Then look no further….this is my “go to” recipe. It is simply the BEST!

cupcake4

For the cake:

  • 1 package of devil’s food cake mix
  • 1 (3.9 oz) package of instant chocolate pudding mix
  • 1 cup sour cream
  • 1 cup vegetable oil
  • 4 eggs, lightly beaten
  • 2 teaspoons of vanilla extract
  • 1/2 cup warm water

Directions:

  1. Preheat oven to 350.
  2. Combine all ingredients in the bowl of your stand mixer. Beat for about two minutes on medium speed until well combined.
  3. Pour into desired pan and bake.

*For bundt cakes, bake 50 to 55 minutes.

*For 9 inch cake layers, bake 25-30 minutes.

*For cupcakes, bake 18 minutes.

Recipe adapted from My Baking Addiction.


For the Peanut Butter Frosting:

  • 3 sticks of unsalted butter, softened
  • 1 cup of creamy peanut butter
  • 2 Tablespoons of vanilla extract
  • 5.5 cups of sifted powdered sugar
  • 6-8 Tablespoons of heavy whipping cream (if using milk, the amount will be less). I only use 4 tablespoons of whipping cream total.

Directions:

  1. In the bowl of your mixer, cream butter and peanut butter on medium speed until light and fluffy….takes a few minutes.
  2. Turn mixer down to low and add in powdered sugar, little by little.
  3. Add vanilla and whipping cream and beat until combined.
  4. Add an additional Tablespoon of whipping cream at a time until you reach desired consistency.
  5. Turn mixer to high speed and beat until smooth and fluffy!

For the chocolate ganache:

  • 4 oz of semi sweet chocolate, cut into little pieces
  • 1/2 c heavy whipping cream
  • 2 Tablespoons light corn syrup
  • 2 Tablespoons vanilla
  • 2 Tablespoons honey

Directions:

  1. Heat cream over medium heat until it starts to bubble.
  2. Place chocolate pieces into a glass (heat proof ) bowl.
  3. Pour the hot whipping cream over the chocolate.
  4. Let it sit for five minutes. Then whisk it together.
  5. Add vanilla, honey, and corn syrup. Whisk together.
  6. Let it sit until you have desired thickness. The longer it sits, the thicker/harder it becomes. Wouldn’t recommend letting it sit longer than 10 minutes.

*Decorate cupcakes or cake as desired.

*I used a 1M Wilton tip to pipe the peanut butter frosting onto the cupcakes, drizzled the chocolate ganache on top, and topped it off with a Reese’s peanut butter cup! Plus I added a little surprise into each cupcake…before baking the cupcakes I lightly pushed a frozen mini Reese’s peanut butter cup into each cupcake!

Enjoy! Would to hear what you think if you give this a try:)

Basic Cupcake Decorating and Icing Tips

One of my favorite things to do is decorate cakes and cupcakes.  Cupcakes are particularly easy, and you can do a lot of different things with them!  Here are a few of my recent cupcakes!

cupcakes cupcake3 cupcake 5 cupcake4

Let’s begin with the icing….Most often I use a basic buttercream icing recipe from Wilton. You can find it here.

Since I have been making this icing for a while, here are a few tips:

  • The temperature of the butter matters here! I like to set my butter out for 30 minutes to an hour before making icing.
  • When mixing the butter and the crisco, make sure to really whip it! You will want to mix on medium to high speed until the butter mixture is pale in color.
  • Be sure to sift the powdered sugar to remove any clumps. This is particularly important for detail decorating!
  • Do not add as much milk as called for in the recipe! Once you have mixed the butter, crisco, vanilla, and powdered sugar you can add a tablespoon of milk. If the icing is still too stiff, add one more tablespoon of milk. I usually make a double batch of this icing and only add two tablespoons of milk total and sometimes none at all!
  • A double batch of icing will make about 6 cups and cover 24 cupcakes decorated like the ones shown above.  I LOVE a cupcake with a lot of  icing;)
  • I make my icing and cupcakes the day before I need them. I store cupcakes in a sealed container on the counter, and store the icing in a sealed container in the fridge.
  • On the day of I will take the icing out of the fridge and whip it with my mixer before using.

NOW that you have icing, let’s talk a little about decorating! Here are a few things you will need to do a basic swirl on your cupcakes. All can be purchased at a craft store or Walmart!

  • Decorating Bags (Wilton’s disposable decorating bags)
  • Wilton cake decorating tip labeled 1M.
  • A coupler is optional. I have a large one purchased from Hobby Lobby, but also saw one at Michael’s today.

Let’s fill our decorating bag with icing. Cut a one inch triangle off the tip of the decorating bag.  Slide the icing 1M tip into the bag so that it is just sticking out. If using a coupler, do the same thing but the coupler goes inside the bag instead of the tip. See below pictures.

DSC_0009 DSC_0010

A little trick I learned along the way is to take a drinking glass and place the decorating bag into the cup. Peal the sides of the bag down around the cup. Now the bag is open and ready for icing.  This is tricky to explain in words, so I took a few pictures too.

DSC_0040 DSC_0038 DSC_0039

In the picture above I filled the bag with red and blue icing to make super cute red and blue spiderman cupcakes. It created a two colored swirl that I loved.

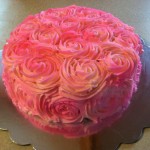
You can also stick with plain white icing and use a color mist spray made by Wilton to give the cupcakes an airbrushed look.  It can be found at Walmart! One of the pictures in the beginning displays the color mist spray, but here is another look at a cake I made with white buttercream icing. I used a pink color mist spray to finish it and give it this two toned look!

cake

SO if you are still reading this, you might want to know how to make the swirls on the cupcakes?? Check out this tutorial from Wilton on how to make the swirls! Click here for the tutorial.

I hope you have found this helpful! I will keep posting tips and tricks as well as some cupcake recipes soon! Happy decorating!


Car track

Need a rainy day activity for the kids?  Use masking tape to make car tracks on your carpet. Be sure to make a garage area, buildings, etc. Here is a race track that the kids and I had just started building…..it was huge by the time we finished and provided so much fun!

car