Teacher Appreciation Week

Teacher appreciation week is coming….it’s May 5-9, 2014. For teachers (being one myself), this week ISN’T about the presents! It’s about the little things kids do that make you smile. These gifts are just small ways we can say thank you to the teachers who work VERY hard for our kids! You can search Pinterest and find tons of ideas or use some of these. Last year I made a M & M teacher appreciation gift that can be found here. This year is my daughter’s first year in elementary school, so I plan to do a little gift for each day of the week for both her teacher and the assistant. Five days and two presents each day could add up so I am doing little thoughtful things that are cost effective! I thought I would share my plan:

Monday: I printed cute bookmarks from here and made candy pencils out of a roll of mentos and a hershey kiss. Too cute!

IMG_0901

Tuesday: The school is doing a themed week, so this day they have asked that each kid write a special note on a sun letting the teacher know how they have helped the kids shine! So we will do that on this day instead of a craft.

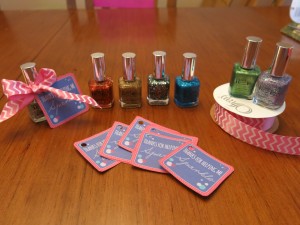
Wednesday: I thought this idea with nail polish was too cute. Click here for the original idea and free printable.

IMG_0898 IMG_0899

Thursday: Who doesn’t love chocolate? Here’s a free printable wrapper to wrap your teacher’s favorite candy bar in.

IMG_0902

Friday:Made cookie bouquets for each teacher. See this post for the how to!

DSC_0003

I will update this post with pictures as soon as I finish making all of these fun treats! Hope you find some inspiration here to help you let your favorite teacher know he/she is appreciated!

4 Ingredient Artisan Style Bread

If you have looked around my site, you will have noticed….I LOVE bread. I know some people are scared to make bread and think it’s too time consuming BUT it really isn’t! It is worth every minute. I saw a super neat pin on Pinterest of a loaf of bread I just had to try. Let me start by saying this bread doesn’t require a mixer or kneading!  You just place ingredients into a bowl, stir, let rise, and then bake! That’s it….only four ingredients too! I hope you are now convinced to go make this bread. I promise it’s easy AND the dough keeps in the fridge for up to two weeks. SO you can have any amount of bread ready in minutes with this dough in the fridge! BONUS!

Ingredients:

  • 3 cups of warm water
  • 1 Tablespoon of active dry yeast
  • 1 and 1/2 Tablespoons of kosher salt
  • 6 and 1/2 cups of bread flour (can also use all purpose flour)

Directions:

  • Pour water into a large bowl and sprinkle yeast on top. (No need to let the yeast proof here)
  • Mix in salt and flour with a wooden spoon until it is all mixed together well.
  • Cover the bowl loosely with a lid (not airtight) and let it rise for two hours.
  • Place bowl (lid still on) into the fridge.
  • When you are ready to bake, pull dough out of fridge and lightly sprinkle flour on top. This is a sticky, wet dough so the flour will help you shape the bread. Tear or cut off the desired amount of dough and shape as desired. I took a large ball of dough and shaped it into a rectangle. Then rolled it up to make a loaf.  Use flour as needed to keep dough from sticking to surface and hands.
  • Place remaining dough (covered) back into fridge to use later. This dough keeps in the fridge for up to two weeks and the flavor changes a bit with age….talk about deliciousness here!
  • Now back to the loaf you just shaped. Let it rest for 20 minutes while preheating the oven to 450.
  • I like to bake bread on a sheet of parchment paper on a cookie sheet. You do have to be careful as parchment paper can and will burn at high temperatures!
  • When your oven is preheated, pour one cup of warm water into a roasting pan or pan with sides (nothing glass). Place this pan of water on the bottom rack of your oven. Put your bread loaf into the oven on shelf above the water pan. Close oven quickly and bake loaf for 20 to 25 minutes until golden in color.
  • That’s it! ENJOY!

This is what my loaf looked like prior to baking. I cut the dough with scissors at a 45 degree angle. For more on how to do this, please visit this amazing site that has the original recipe as well!

And another picture of this bread recipe made into bread bowls for soup!


Willy Wonka Birthday Party

I am excited to share with you a Willy Wonka birthday party theme created by a special and super talented friend of mine, Harmony . She even has free printables for you if you want to recreate a similar party! Go check out Harmony’s website to see all of the crafty things she has been making lately in addition to this amazing party she just threw for her sweet little girl!

Click here to go to Harmony’s website! Be sure to look around as her site is full of neat stuff!


Beer Bread

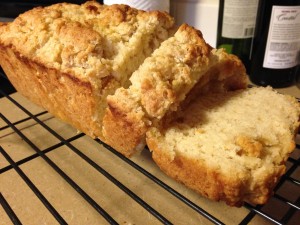
I am not a fan of beer…nothing about it do I like;) HOWEVER, use it in a loaf of  bread and I am sold!  I thought I would share the beer bread recipe I have been making for over a year now. Usually the crust isn’t my favorite part of bread, but with all the butter involved this crust is hands down the best part!

IMG_1069

Ingredients:

  • 3 cups of all purpose flour (I use better for bread flour), sifted
  • 3 teaspoons of baking powder
  • 1 teaspoon of salt
  • 1/4 cup of sugar
  • 1 (12 oz) bottle or can of beer (I use honey brown beer for the honey flavor)
  • 1/2 cup of melted butter (can use 1/4 cup if you prefer)

Directions:

  1. Preheat oven to 375.
  2. Sift the flour.
  3. Mix all of the dry ingredients together.
  4. Pour in the beer and mix well.
  5. Pour the batter into a greased loaf pan.
  6. Melt the butter and then pour on top of the batter in the loaf pan.
  7. Bake 50 minutes to 1 hour.

*I always put a cookie sheet under the loaf pan, just in case the butter spills over the sides while it cooks. I remove the cookie sheet halfway through cooking once I know the butter isn’t going to spill. If the butter spills into the bottom of the oven, it creates a not so fun burning smell!

Hope you enjoy this easy beer bread recipe!